
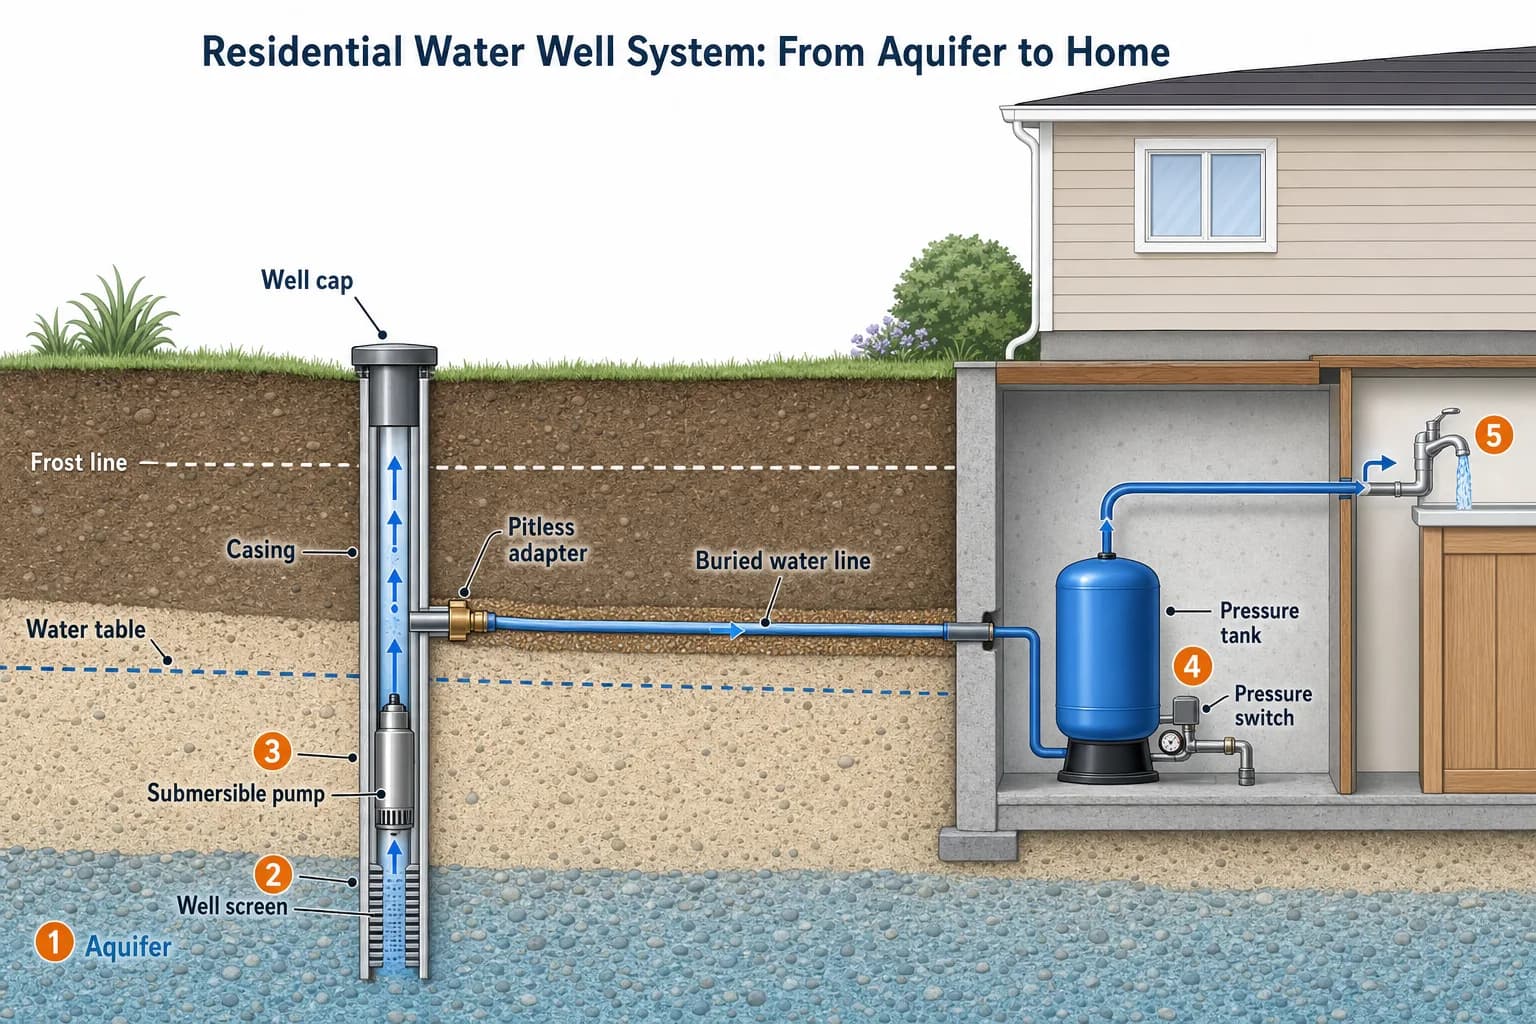
The Big Picture: Five Steps From Rain to Faucet
Every private well system, from a 1960s farmhouse to a new build, does the same five things:
- An aquifer stores groundwater beneath your property.
- A cased borehole reaches down into it and keeps contamination out.
- A pump lifts water up the well and pushes it toward the house.
- A pressure tank and pressure switch store water under pressure and decide when the pump runs.
- Your household plumbing distributes it, with any treatment equipment in line.
Unlike city water, there is no utility behind it - the whole chain belongs to you, which is why knowing how it works pays off the first time something acts up. (Weighing the two? See well water vs. city water.)
Step 1: The Aquifer - Your Underground Reservoir
Groundwater is not an underground lake. It is water filling the pore spaces in sand, gravel, and cracked rock.
Rain and snowmelt soak into the ground and percolate down until they reach a zone where every pore and fracture is saturated. A layer of saturated material permeable enough to yield useful water is an aquifer. The top of the saturated zone is the water table, and it rises and falls with the seasons.
Which aquifer your well taps decides almost everything about it: depth, yield, and water chemistry. Find out what aquifer you are in, check the water table depth near you, or browse logged wells on the well map to see what your neighbors drilled into. Some wells tap pressurized confined aquifers - see artesian wells for that special case.
Step 2: Casing and Screen - the Well Itself
The well is a lined, sealed tube - engineered so the only way in is from the aquifer.
A drill rig bores down into the aquifer, and the hole is lined with casing - steel or PVC pipe that holds the hole open and seals out everything above the aquifer. The space between casing and borehole is filled with grout, and a sanitary well cap seals the top against insects and runoff.
At the bottom, water enters either through a well screen (a slotted section that holds back sand while admitting water) or, in bedrock wells, directly from open rock fractures below the casing. From there it stands in the well at the level of the water table, waiting for the pump.
The construction details - depth, casing length, yield at completion - are recorded on the well's log, filed with the state. If you have never seen yours, look up your well record.
Step 3: The Pump - the Only Moving Part That Matters
In most modern wells, a submersible pump hangs deep in the casing and pushes water up.
The workhorse of a modern drilled well is the submersible pump: a slim electric motor and multi-stage impeller stack, typically 4 inches around, hanging on a drop pipe far down the well below the water level. When it runs, it pushes water up the drop pipe - pushing being far more effective than pulling, which is why submersibles handle deep wells that suction-based jet pumps (mounted above ground, common on shallow wells) cannot.
Sizing matters more than brand: the pump must match the well's depth, the household's demand, and the well's yield. The full picture - types, sizing, lifespans - is in our well pumps guide; when it is time to replace one, see what pump replacement costs.
Step 4: Pressure Tank and Pressure Switch - the Brains
The pump makes water available; the tank and switch make it feel like city water.
If the pump started every time you opened a tap, it would burn itself out in short-cycling starts. The pressure tank prevents that: it stores a cushion of water squeezed against compressed air (behind a rubber bladder or diaphragm in modern tanks). Open a faucet, and air pressure pushes stored water out to the house - silently, with the pump off.
Watching over it is the pressure switch, a simple device plumbed into the line, usually set to 40/60 psi (or 30/50): when tank pressure falls to the cut-in number, it powers the pump; when the pump has rebuilt pressure to the cut-out number, it shuts it off. That cycle - drawdown, cut-in, refill, cut-out - repeats quietly all day, and the size of the tank sets how often the pump has to start.
Weak showers, rapid pump cycling, and pressure that surges and fades are usually tank-and-switch territory, not the well itself - our well water pressure guide covers diagnosis and fixes.
Step 5: Into the House
From the pressure tank, water enters the home's plumbing like any city supply would. Two well-specific details sit on this leg:
- The pitless adapter: the buried fitting that routes the water line out through the casing wall below the frost line, so the supply cannot freeze. It is why nothing protrudes from your casing above ground except the cap.
- Treatment equipment, if any: softeners, iron filters, UV lights, or reverse osmosis units install between the tank and the fixtures. What you need (often nothing; often one targeted fix) should be decided by a proper water test, not by a salesman's hunch.
If you have never seen a lab report for your well, that is the one piece of this system worth ordering today - certified kits are in our water test store, and the well water testing guide explains what belongs on the panel.
What a Healthy Well System Looks Like
For the deeper routine - what to check monthly, annually, and every few years - see the well maintenance guide and its printable checklist.
Frequently asked questions
Keep reading
- Well Components Guide - every part in detail, with diagrams.
- Well Pumps Guide - submersible vs. jet, sizing, and lifespan.
- Types of Water Wells - drilled, dug, and driven wells compared.
- Cost to Drill a Water Well - what a new system costs, itemized.
Sources & further reading
- Learn About Private Water Wells — U.S. EPA (accessed July 2026)
- Wells (Water Science School) — U.S. Geological Survey (accessed July 2026)
- Well Construction — NGWA / WellOwner.org (accessed July 2026)
- Protect Your Home's Water — U.S. EPA (accessed July 2026)