Small part, massive impact - this guide explains why a secure well cap is the unsung hero that protects your family's drinking water.
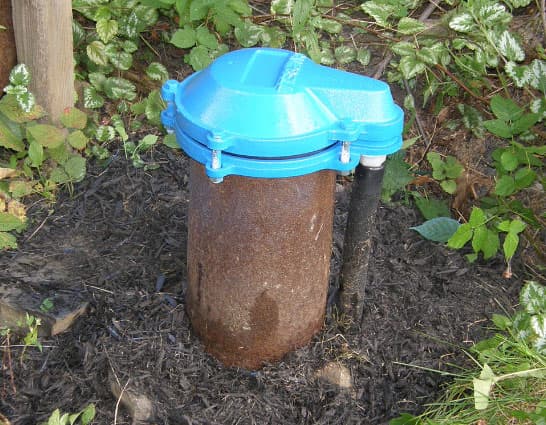
It's easy to overlook the simple device sitting quietly atop your well casing. You may hear it called a well cap, well cover, or sanitary seal—they all refer to the critical component that seals the top of your well casing. It is arguably one of the most critical parts of your entire water system. A properly installed and maintained well cap is your first and most important line of defense against a host of potential contaminants. Without a secure seal, insects, surface runoff, and debris have a direct path into your groundwater source. This guide will walk you through the types of caps, what they cost, how sizing and replacement work, inspection and maintenance, and why a high-quality vermin-proof cap is a non-negotiable investment in your family's health.
The EPA and state health departments warn that a damaged, poorly fitted, or missing well cap or cover is a direct contamination pathway. A proper sanitary cap is engineered to prevent specific threats:
Rainwater and irrigation runoff can carry pesticides, fertilizers, bacteria from animal waste, and spilled fuel or oil directly into an unsealed casing. A gasketed cap forms a physical barrier against this threat.
Earwigs, ants, spiders, and even small animals are drawn to the dark, damp environment of a well casing. A "vermin-proof" cap has a screened vent and a tight seal to keep them, and their waste, out of your water.
Lawn equipment, falling branches, or curious children can dislodge a loose cap. Bolted sanitary caps resist impacts and require tools for removal, safeguarding the wellhead integrity.
Not all well covers offer the same level of protection. Older wells may have a simple "standard" cap, but modern regulations in most states mandate the use of more secure sanitary caps.

Compared to the rest of your well system, the cap is one of the cheapest components you will ever buy - and one of the most important. Typical retail prices:
Well caps are sized by the outer diameter (OD) of the well casing. The most common residential size is the 6" cap (6" or 6.25" OD steel or PVC casing), with 4", 5", and 8" also widely used. Measure the casing pipe itself with a tape measure or calipers - an old, damaged cap is not a reliable reference. If the measurement falls between sizes, note whether the casing is steel or PVC and confirm the fit with the supplier before ordering.
Replacement itself is quick - the care is in keeping the open well sanitary. The EPA advises keeping the wellhead sealed and disinfecting the well whenever it has been opened, which is why most homeowners have a licensed well professional do this work. A typical replacement looks like this:
Well cap requirements are set state by state in each well construction code. Many states now require an approved vermin-proof (sanitary) cap on new wells and a casing that terminates at least 12 inches above grade - Michigan's EGLE guidance on insects in water wells (cited below) is a good example of why. Before buying a replacement, check the rules for your state in our state-by-state well guides or ask your county health department.
Perform this quick inspection each season and after major events like storms, flooding, or nearby landscaping work.
While the terms are often used interchangeably, 'well cap' typically refers to the engineered, bolted, and gasketed device that seals the top of the well casing. 'Well cover' is a broader term that can mean the same thing, but sometimes also refers to simpler lids or even decorative items like faux rocks that go over the wellhead. For protecting your water quality, you should always ensure you have a proper sanitary well cap.
The cap itself is inexpensive. A basic standard (contractor) cap typically runs $15-$40, a sanitary vermin-proof cap runs about $40-$120 depending on casing diameter, and specialized watertight caps run roughly $50-$150. If you hire a licensed well professional to replace the cap and shock-chlorinate the well afterward - the recommended approach - expect a total of about $150-$400 including labor.
Well caps are sized by the outer diameter (OD) of the well casing, not the old cap itself. Use calipers or a tape measure to get a precise measurement of the steel or PVC pipe. Common residential sizes are 4", 5", 6", and 6.25". When in doubt, take a clear photo of the casing and measurement to a professional supplier.
While physically possible for a handy homeowner, it is highly recommended to hire a licensed well professional. Opening the well exposes it to contamination. A professional will use sanitary procedures and, most importantly, will shock-chlorinate the well after installation to disinfect it before sealing it back up. Incorrect installation can negate the cap's benefits.
Yes, absolutely. The bolts are what create the protective seal. They work by compressing the rubber gasket evenly against the rim of the casing. Even one loose or missing bolt creates a gap, breaking the seal and providing an entry point for insects and contaminated water.
The screened vent is crucial. As the pump draws water down, the water level in the well drops, and air must be allowed in to equalize the pressure. Without a vent, a vacuum could form, straining the pump, reducing water flow, and potentially sucking contaminants in from outside the casing.
Even with a perfect cap, you should test your water annually for total coliform bacteria, E. coli, and nitrates. These tests are key indicators of water safety. A test is also essential after any well repair, after a major flood, or if you notice any change in your water's taste, odor, or appearance.
A properly installed sanitary well cap or cover is low-cost insurance against bacterial contamination, expensive repairs, and health risks. Inspect it seasonally, keep the area clear, and contact a licensed professional if you spot damage. It's a small step that provides peace of mind with every glass of water.