
Job Costing Setup
Job costing compares what a project cost you against what you billed for it. Before those numbers mean anything, DrillerDB needs three things: a list of cost codes, a labor rate for each employee, and an hourly rate for each piece of equipment. This page is where you enter all three and set the rules that capture costs automatically.
Open Settings > Job Costing, under the Billing & Finance heading in the settings list. The page reads "Configure cost codes and employee rates for job costing".
The portfolio view of the resulting numbers lives elsewhere. For budget against actual against billed, WIP, and retainage, see Job Costing under Accounting.
Quick Start
- Open Settings > Job Costing.
- Turn on Enable Job Costing.
- Work the Setup Status checklist: add your Cost Codes, then Employee Rates, then Equipment Rates.
- Choose which costs DrillerDB captures on its own under Auto-Capture.
- Set your Burden Multiplier and Margin Thresholds.
- Click Save Settings.
Step-by-Step: Work the setup checklist
The Setup Status card sits at the top of the page and counts how many of the three pieces you have finished.
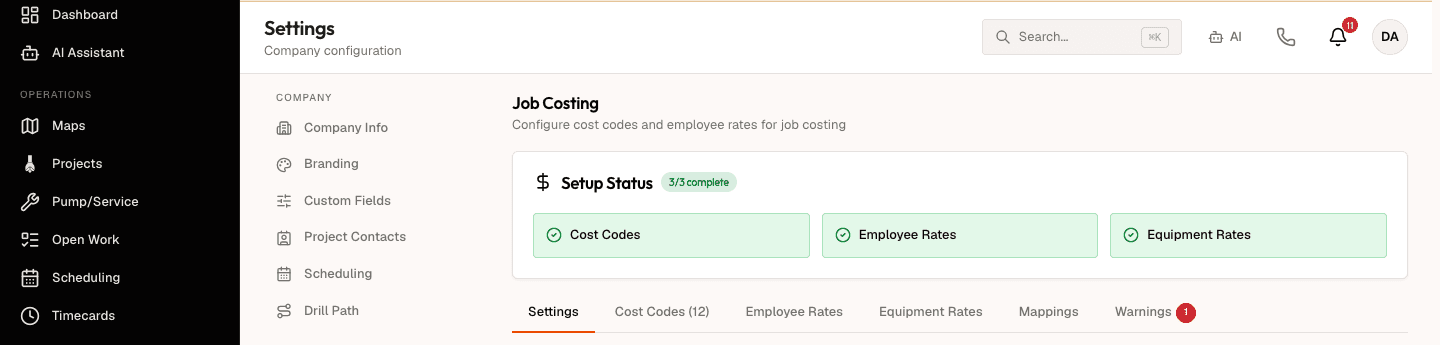
The badge reads 3/3 complete and turns green when all three are done. Until then it stays amber and names how many are finished. Each item turns green as soon as you save that piece, and it stays green when you come back to the page later.
Work the three tabs in order. Each is a tab on this same page.
- Cost Codes - your own chart of job costs, such as
200 - Drilling Laboror510 - Pump Installation Labor. Every code needs both a number and a name. The tab heading carries the count, so Cost Codes (12) means twelve are saved. - Employee Rates - the hourly labor rate for each person. Rates are effective-dated, so a raise does not rewrite the cost of work already done.
- Equipment Rates - the hourly rate for each rig, truck, or pump hoist. These are effective-dated too.
Two more tabs sit beside them once the basics are in place:
- Mappings ties each source of cost to a cost code, so captured costs land in the right bucket without anyone choosing. There are four maps: labor allocation type, labor shift type, inventory category, and equipment cost type.
- Warnings lists what capture could not resolve, such as a timecard with no rate on file. The tab carries a count of the unresolved ones, and an admin can clear them from there.
Step-by-Step: Set the capture rules
The Settings tab holds one card, Job Costing Configuration.
| Setting | What it controls |
|---|---|
| Enable Job Costing | The whole feature. Turn it on to track costs against project budgets. |
| Auto-Capture: Labor Costs | Pulls labor from approved timecards. |
| Auto-Capture: Material Costs | Pulls materials from inventory usage. |
| Auto-Capture: Equipment Costs | Pulls equipment usage and depreciation. |
| Burden Multiplier | Multiplies base labor rates to cover taxes, insurance, and benefits. A value of 1.3 puts 30 percent on top of base wages. |
| GPS Proximity | How far, in miles, a GPS check-in can be from a job site and still count as work on it. A timecard inside the radius is matched to the nearest project. |
| Margin Thresholds | Two percentages, Warning below (%) and Good above (%). Jobs under the warning number show red and jobs over the good number show green. |
| Excessive Hours Threshold | Flags any daily timecard longer than this number of hours for review. |
Click Save Settings when you are done. Nothing on this card saves on its own.
Auto-capture reads approved timecards, inventory usage, and equipment logs going forward. Setting it up halfway through a job leaves the earlier days uncosted, and you have to add those by hand on the project's Costs tab.
Related Topics
- Project Costs - the per-project Costs tab, where captured and hand-entered costs appear.
- Job Costing - budget against actual against billed across every project, WIP, and retainage.
- Timecards - where captured labor comes from.
- Inventory - where captured material comes from.