
Job Map
Job Map shows your projects and pump/service work on a shared map, so your team can see coverage, spot nearby jobs, and open a record without digging through lists.
Quick Start: Open Job Map
- Click Maps in the left menu.
- The Job Map opens with a pin for each job.
- Click a pin to see that job, or use the filters in the top toolbar to narrow what shows.
- Open the full project or work order from the job panel.
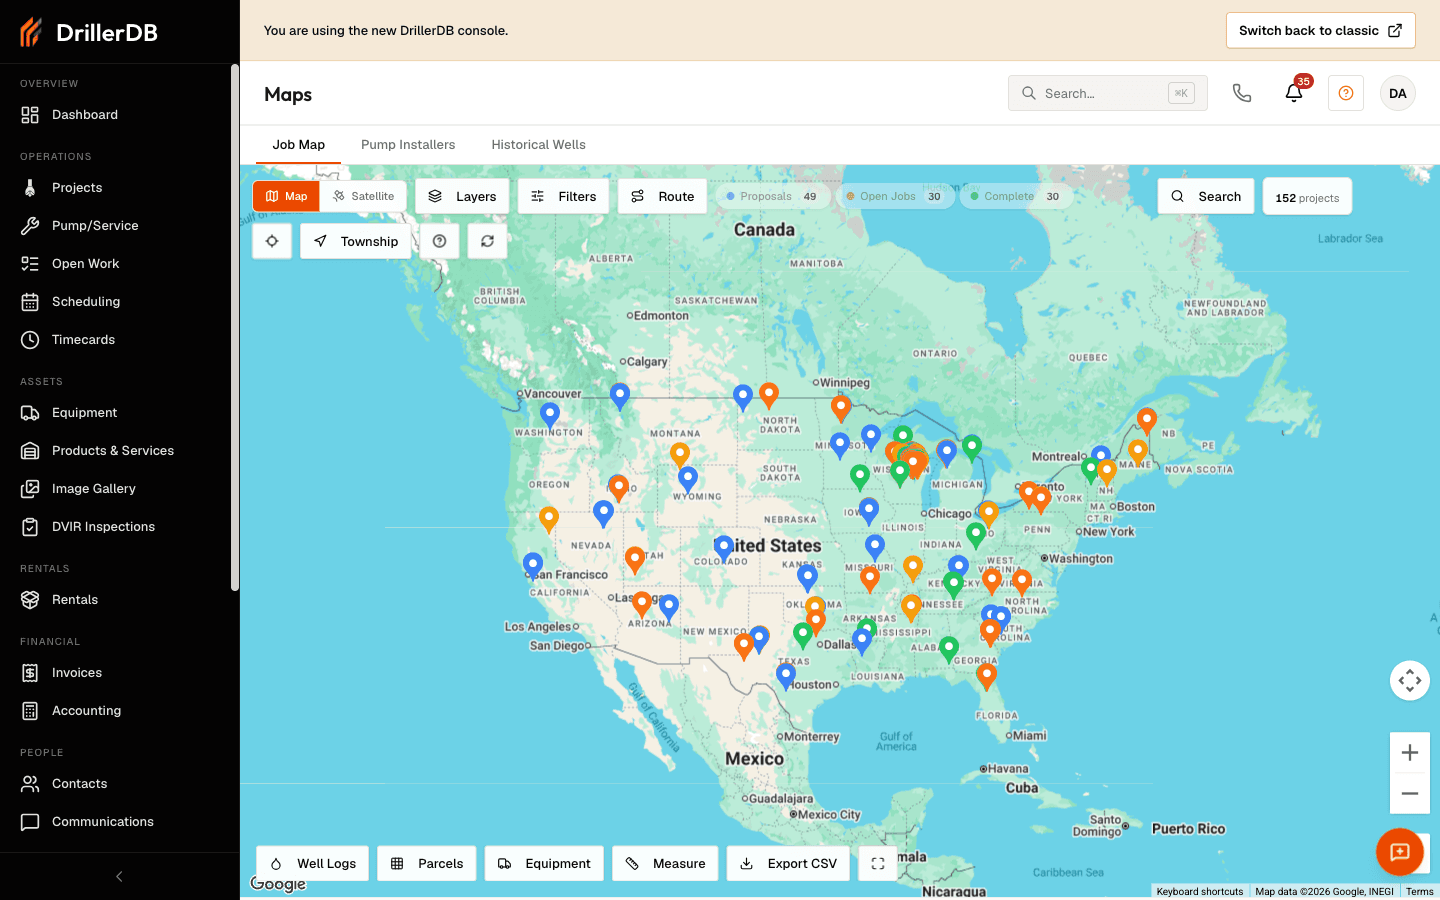
Step-by-Step: Find and Open a Job
- Each job shows as a pin at its location.
- Click the pin to open it. The whole marker is clickable, not just its center, so you do not have to hit the exact point.
- Clicking an empty part of the map, away from any pin, closes the panel.
On a touch screen, tap the pin itself. If a pin sits close to another map feature, zoom in first so the two separate.
Open a Well That Sits Near a Job Pin
A job pin covers a small area of the map. When a well record sits under that pin or right beside it, the pin takes the click and the job opens instead of the well.
To reach the well, take the job pins off the map first.
- Click the Historical Wells tab. Job pins do not show on this tab.
- Click Well Logs in the bottom toolbar and choose All Wells.
- Zoom in to at least street level. Wells do not respond to clicks when you are zoomed out too far.
- Click the well dot to open its record.
To stay on the Job Map instead, open the Layers panel and turn the Projects layer off. A banner confirms that project markers are hidden. Turn the layer back on when you are done.
The Well Logs button picks which set of wells to show, so it is not a simple on/off switch. My DrillerDB Wells shows wells you completed in DrillerDB, My Wells shows public state filings matched to your company, and All Wells shows every state well log on file.
To see which wells are near a job without leaving the panel, open the job and expand Nearby Wells. The list gives each well's depth, year, and distance. It does not link to the full well record, so use the steps above when you need the well log itself.
The Job Panel
Clicking a pin opens a panel for that job with quick actions across the top:
| Action | What it does |
|---|---|
| Open | Opens the full project (or the pump/service work order) |
| Navigate | Opens driving directions to the job in Google Maps |
| Dispatch | Opens the dispatch window to send a crew to the job |
| Add to Route | Adds the job to your route plan; the button reads On Route once it is added |
Below the actions, the panel shows the job's details: ID, well type, drill type, status, priority, expeditor, and field tech.
Double-click a pin to jump straight to the full project record, skipping the panel.
Several Jobs at One Spot
When more than one job sits at the same location, the map shows a single badge with a number instead of stacked pins.
- Click the badge.
- A panel lists every job there, headed "N projects at this location."
- Click any job in the list to open it.
- Click Back to N Projects to return to the list.
Marker Colors and Labels
The pins are color-coded so you can read the map at a glance.
| Pin | Meaning |
|---|---|
| Letter marker (for example "R" or "C") | A drilling project - the letter is the first letter of the drill type |
| Purple circle with a wrench | A pump/service work order |
| Teal marker with a water drop | A job waiting on a pump |
For drilling projects, the marker color reflects the job's priority - higher-priority jobs stand out in red or orange, and lower-priority jobs show in green or gray.
Map Controls
| Control | Action |
|---|---|
| Drag | Pan the map |
| Scroll / + / - | Zoom in or out |
| Map / Satellite | Switch between the road map and satellite view |
| Status filters (Proposals / Open / Completed) | Show or hide jobs by status |
| Current location button | Center the map on your own location (needs browser location access) |
Each pin sits at the job's saved location, taken from the project's address or GPS coordinates. The current location button shows where you are right now, not where a job is - use it to see which jobs are closest to you.
Filtering
Use the filters in the top toolbar to cut down map clutter and focus on the work that matters right now.
| Filter | Typical Use |
|---|---|
| Status | Show only proposals, open jobs, or completed jobs |
| Employee / Well Type / Drill Type | Narrow to one crew or one kind of work |
| Priority | Focus on your highest-priority jobs |
| Search / Select by ID | Jump to a specific customer or project |
Troubleshooting
No pins visible
- Confirm the jobs have valid coordinates
- Clear the filters
- Zoom out and try again
A pin is in the wrong place
- Open the project
- Update its address or GPS values
- Return to the map and refresh
Current location button does not work
- Allow location access when your browser asks
- Check that location services are turned on for your device
Searching an address finds no wells
The map search takes an address, a place name, or a latitude, longitude pair. It centers the map and then lists the state-reported wells near that point.
The search starts at 2 km around the address. If that comes back empty, or with fewer than five wells, it widens to 5 km and then to 10 km and stops at whichever pass found enough. The panel names the radius the list actually came from, so a list headed 10 km is telling you the two closer passes were thin.
Wells are listed whether or not the state published a scanned log for them. A filing that carries a depth but no log document still appears. So does a filing that records only a casing depth and no drilled depth, which is common in some state datasets. Those wells are marked as casing depth and are left out of footage estimates, because a casing depth is not how deep the well was drilled.
If the search comes back empty, click Well Logs in the bottom toolbar, choose All Wells, and look at the map around the address.
Related Topics
- Project Map - Single-project location view
- GPS Coordinates - Manage location data
- Map Filtering - Advanced filtering
- Directions - Navigation workflows