Chat with us, powered by LiveChat
NewDrillerDB Enterprise SalesSee it
Well Owner Guide

Well Pump Pressure Switch: Settings, Adjustment, and Troubleshooting

A $30 switch runs your entire water system. Here is how it works, how to adjust it without getting hurt, what the clicking and chattering mean, and when to simply replace it.

10 min readUpdated July 2026
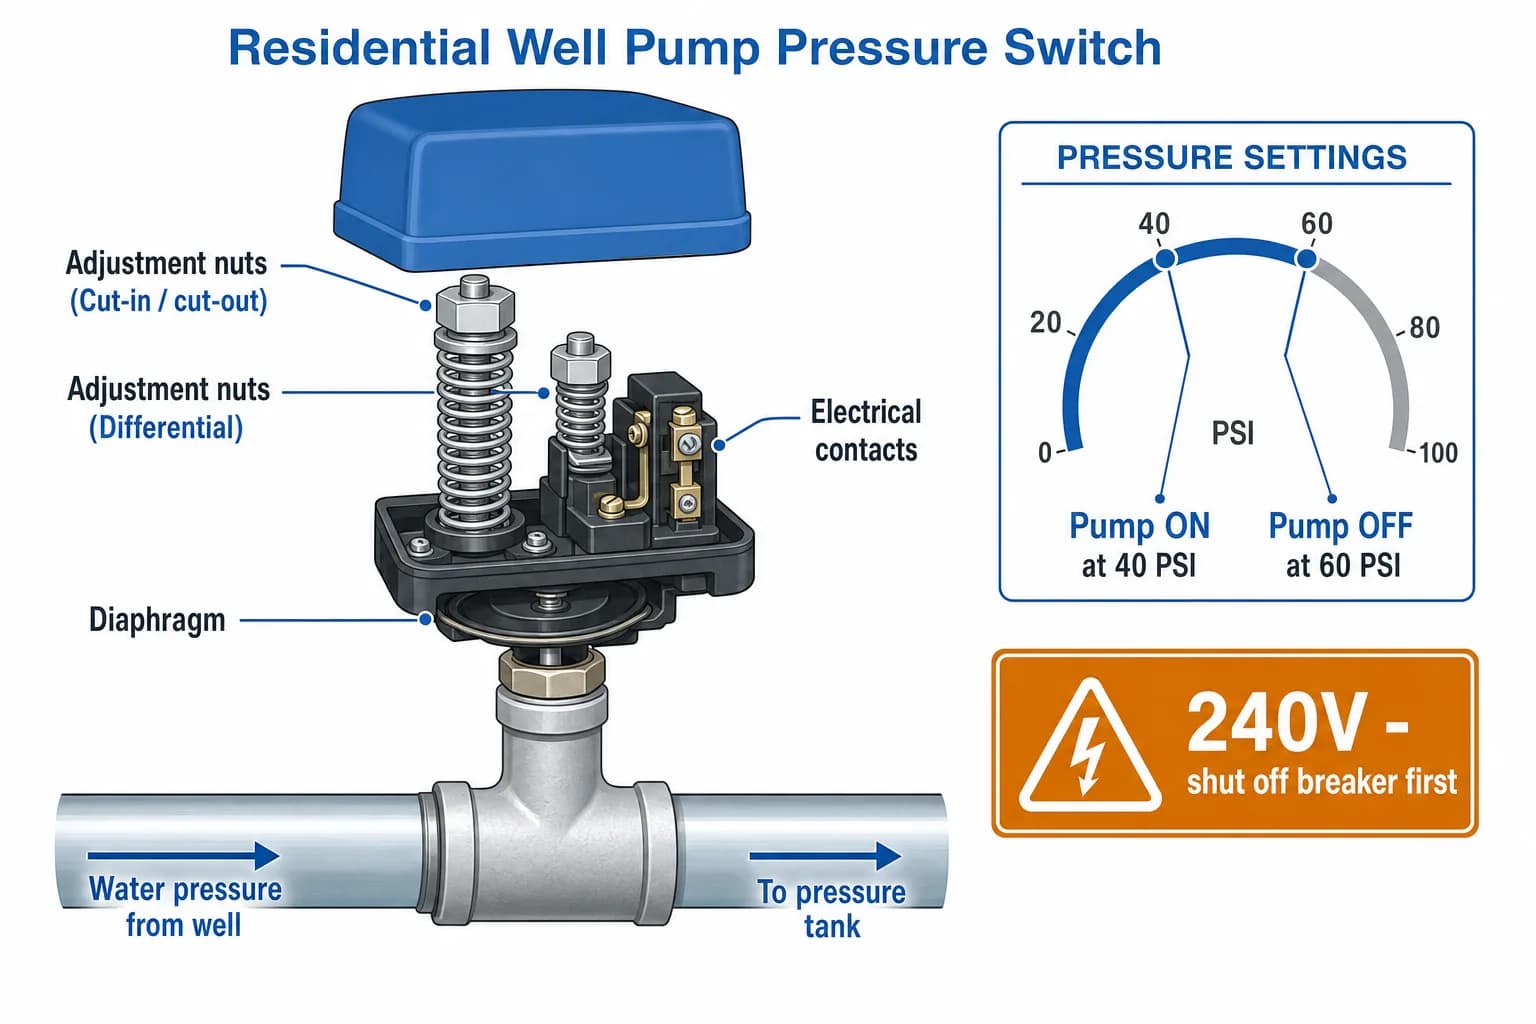
Diagram of a well pump pressure switch on a tank tee showing the adjustment nuts, electrical contacts, and diaphragm, with a 40/60 PSI cut-in/cut-out dial and a 240-volt shut-off-breaker-first warning
Inside a 40/60 pressure switch. Kill the breaker before the cover ever comes off.

What the Pressure Switch Does

Between your pressure tank and the house plumbing sits a small gray box on a quarter-inch pipe nipple. Inside it, water pressure pushes against a diaphragm and spring - and that spring tension decides when your pump runs.

The pressure switch is a mechanical thermostat for water pressure. When system pressure falls to the cut-in setpoint, the spring wins, the electrical contacts snap closed, and 240V power flows to the pump. As the pump refills the pressure tank, pressure climbs; at the cut-out setpoint the diaphragm wins, the contacts snap open, and the pump stops. Every shower, every dishwasher fill, every hose bib - all of it is orchestrated by this one part.

Most residential switches are the Square D Pumptrol pattern or an equivalent: two spring-loaded nuts under the cover (range and differential), a sensor port underneath that can clog with iron sediment, and contacts that arc a little on every cycle until, after years, they pit, burn, or weld. Knowing those three failure points is 90% of troubleshooting.

The Hard 240V Stop Line

The pressure switch is where household DIY meets lethal voltage. The rules here are absolute, and they are the same rules a licensed tech follows.

Electrocution hazard - read before touching the switch
The switch carries 230-240 volts whenever the breaker is on - enough to kill. Before the cover comes off: shut off the double-pole breaker at the panel, then verify the switch is actually dead with a non-contact voltage tester (breakers get mislabeled). Never measure live voltage, never adjust the nuts with power on, never work on it standing on a wet floor. If any of that gives you pause, hire a licensed well contractor - a switch service call is cheap.
DIY-safe vs licensed-pro-only at the pressure switch
TaskDIY-safeLicensed pro only
Watch cut-in/cut-out behavior at the pressure gauge
Remove the cover and inspect contacts (breaker OFF, verified dead)
Adjust the range nut (breaker OFF, then test)
Continuity-test contacts with a multimeter (power OFF)
Measure live voltage at the switch terminals
Replace the switch if you are unsure about the wiring

30/50 vs 40/60: What the Numbers Mean

The two numbers are cut-in and cut-out in PSI. Factory switches ship at 30/50 or 40/60, and the 20 PSI spread between them is by design.

The two standard pressure switch settings
Feature30/50 PSI40/60 PSI
Shower / appliance feelAdequate, dips noticeableStrong, steadier
Stress on pump and plumbingLowerModestly higher
Required tank pre-charge28 PSI38 PSI
Typical useOlder systems, marginal pumpsModern default for most homes

The printed setting is on the label inside the switch cover. Two cautions before chasing higher pressure: (1) confirm your pump can actually reach the new cut-out - a worn pump asked to hit 60 PSI it can no longer reach will simply run forever; (2) the tank pre-charge must move with the cut-in (always 2 PSI below it), or you trade your pressure problem for a short-cycling problem. If low pressure is the complaint driving you here, run through the well water pressure diagnosis first - the cause is often a clogged filter, not the switch.

How to Adjust the Switch (Safely)

Two nuts live under the cover. The tall center one is the only one most homeowners should ever turn.

Safe adjustment procedure

As needed

Total time about 20 minutes, most of it watching the gauge.

  • Kill the double-pole breaker and verify dead
    Non-contact voltage tester at the switch before the cover comes off.
  • Remove the cover and find the tall center range nut
    It sits on the larger spring. The smaller nut (if present) is the differential.
  • Turn the range nut clockwise to raise pressure
    Roughly 2-3 PSI per full turn on common Pumptrol-style switches - the label inside your cover states the exact rate. Count your turns.
  • Reset the tank pre-charge to the new cut-in minus 2 PSI
    Drained system, tire gauge on the tank air valve. Skipping this causes short cycling.
  • Replace the cover, restore power, and watch a full cycle
    Run a faucet and confirm the pump cuts in and out at the new numbers on the gauge.
  • Leave the differential nut alone
    It raises cut-out only, narrowing or widening the band. Set wrong, it makes the pump cycle constantly.
Do not chase pressure past 60 PSI
Residential systems, fixtures, and most pressure tanks are engineered around a 60 PSI ceiling. Cranking the range nut toward 70+ stresses the pump, can exceed the relief valve, and voids many tank warranties. If 40/60 is not enough, the right upgrade is a constant-pressure system, not a tighter spring.

Troubleshooting by Symptom

The switch either lies about pressure (clogged port), fails to make contact (corroded, welded, or burned contacts), or reports a problem that lives elsewhere. Match the symptom.

  • Pump will not start; gauge reads low. Breaker first (reset once only - a breaker that re-trips instantly means a dead short, stop and call a pro). Then, power off and verified dead: look for corroded or visibly burned contacts, and suspect a sensor port clogged with iron sediment - the switch never feels the pressure drop. A clogged nipple can be cleaned, but on a switch more than a few years old, replacement is the smarter hour.
  • Pump will not stop; pressure sits at cut-out or climbs. Contacts may be welded closed by arcing, or the port is clogged so the switch never feels cut-out. Kill the breaker to protect the pump, then replace the switch. If a new switch does not fix it, the pump may be unable to reach cut-out at all - that branch is covered in the pump troubleshooting guide.
  • Rapid clicking (short cycling). Usually not the switch - it is the messenger for a waterlogged pressure tank. Test the tank air valve before condemning the switch.
  • Chattering, buzzing, visible arcing. Pitted contacts or a loose wire. Burned contacts only get worse; replace the switch.
  • Weeping or spraying water at the switch. The diaphragm has failed or the nipple fitting is leaking. Water plus 240V is an emergency: breaker off, then a same-day fix.

Replacement: Steps and 2026 Cost

Switches are wear items. After 10-15 years of arcing, or at the first sign of burned contacts, swap it - the part costs less than a pizza night.

$120 - $175

typical installed cost of a pressure switch replacement (the part itself is $25-$50)

Source: HomeAdvisor

A pro replacement is quick: breaker off and verified, wires photographed and disconnected, old switch unthreaded from the nipple, the nipple checked and cleared of sediment, new switch (matched 30/50 or 40/60) threaded on with sealant, wires landed, tank pre-charge verified, and a full cycle watched at the gauge. A skilled DIYer can do the same with the power off and verified dead - but if there is any doubt about which wires are which, this is a cheap job to hand to a licensed pro. Get the tech to sanity check the tank and gauge in the same visit; the three fail as a set.

Pressure switch and neighbors: 2026 replacement costs
ItemTypical LowTypical HighNotes
Pressure switch, installed$120$175Part $25-$50 plus labor and calibration. [HomeAdvisor]
Pressure gauge, installed$100$175Often replaced with the switch. [HomeAdvisor]
Pressure tank, installed$300$2,000+If the real problem was the tank all along.

National ranges; get 2-3 local quotes and budget toward the higher end of what you are quoted.

Frequently asked questions

It is the brain of the pressure system: a spring-loaded electrical switch that watches water pressure and cycles the pump between two setpoints. When pressure falls to the cut-in number (30 or 40 PSI), the contacts close and the pump starts; when it climbs to the cut-out number (50 or 60 PSI), the contacts open and the pump stops.
40/60 gives noticeably better shower and appliance pressure and is the common modern setting; 30/50 is gentler on old plumbing and marginal pumps. Whichever you run, the pressure tank's air pre-charge must be set 2 PSI below cut-in (28 or 38 PSI) - changing the switch without resetting the tank causes short cycling.
With the breaker OFF: remove the cover, then turn the tall center range nut clockwise to raise both cut-in and cut-out (roughly 2-3 PSI per full turn on common Square D Pumptrol switches - check the label inside your cover). The smaller differential nut raises cut-out only; most homeowners should leave it alone. Restore power and watch a full cycle at the gauge to verify.
Rapid clicking is short cycling, and the switch is usually the messenger, not the culprit: the classic cause is a waterlogged pressure tank whose bladder has ruptured. Confirm with the air-valve test (water spitting out = failed tank). If the tank checks healthy, then suspect a clogged switch sensor port or a big leak.
Chattering - fast open-close fluttering you can hear at the switch - usually means pitted or burned contacts, a loose wire, or pressure pulsing at the sensor port. Burned contacts come from arcing as they age. With the breaker off and verified dead, look for scorched or pitted contact points; a switch with visibly burned contacts should be replaced, not filed and nursed along.
Check the breaker first - a tripped 240V double-pole breaker is the most common cause of a dead pump (reset it once only). If the breaker is fine, the switch contacts may be corroded or welded, or the sensor port clogged with iron sediment so the switch never sees the pressure drop. Those are visual checks you can make with the power off; anything involving a live voltage measurement belongs to a pro.
It is one of the cheapest well repairs: $120-$175 installed in most areas (the switch itself is a $25-$50 part). If you are hiring the visit anyway, have the tech verify the tank pre-charge and gauge at the same time - the three parts work as a set and fail as a set.
Only with the power off. A continuity (resistance) test across the contacts with the breaker off and verified dead is a safe DIY check. Measuring live voltage at the switch is a lethal electrocution hazard and is exactly where the DIY line ends - that measurement belongs to a licensed pro.

Keep reading

Sources & further reading

  1. Private Drinking Water WellsU.S. EPA (accessed July 2026)
  2. Wellowner.org - Well System Components (pressure switch, tank, gauge)Water Systems Council (accessed July 2026)
  3. How Much Does Well Pump Repair Cost? (pressure switch $120-$175 installed)HomeAdvisor (accessed July 2026)

Not comfortable at the panel? That is the right instinct.

Pressure switch work sits right at the 240V line. A local pump pro swaps one in under an hour - pull your well record first so they know your system before they arrive.